
What Garage Insulation R-Value Do You Need for Your Climate Zone?
Choosing the wrong R-value for your garage insulation can leave you with a cold, drafty space and surprisingly high energy bills. Let me cut through the confusion and give you clear, zone-based recommendations.
We will cover how R-values actually work, how to find your DOE climate zone, and the specific R-value targets for garage walls, ceilings, and doors.
I base this advice on my own shop experience installing and upgrading insulation in garages from humid southern states to freezing northern climates.
R-Value Demystified: What That Number Actually Does for You
Think of R-value as your insulation’s winter coat rating. A higher R-value means a thicker, better coat. Technically, it’s a measure of resistance to heat flow. The higher the number, the better your insulation resists heat passing through it.
A higher R-value in your garage walls means less heat escapes in winter and less heat sneaks in during summer. This translates directly to a space that’s more comfortable to work in and cheaper to condition, whether you’re running a small heater or an AC unit.
Where you live dramatically changes the “coat” you need. That’s why pros always start by talking about climate zones.
Why Garage Insulation R-Value Isn’t One-Size-Fits-All
If you tried to use the same insulation in Florida and Minnesota, one of you would be very disappointed. The R-value you need is a direct response to your local weather extremes.
Your insulation’s job changes with the seasons, and the required R-value is based on the most demanding part of your year. In a cold zone, it’s all about keeping precious heat in. In a hot zone, it’s about blocking radiant heat from baking your garage. This is where garage temperature control insulation comes in, helping you maintain a steady, efficient temperature year-round.
You also can’t use one number for the entire garage. Ceilings (or attic spaces above) need a higher R-value than walls because heat rises. Your garage door is a whole different challenge, often needing a separate, insulated door or a retrofit kit. Building codes reflect this, giving different minimums for walls, ceilings, and floors.
Mapping Your Project: Understanding the 8 Climate Zones
To make sense of insulation recommendations, building experts divided the country into eight climate zones. These zones, numbered 1 through 8, are based on temperature and humidity. Your local building department uses this system to set code requirements, so it’s the perfect place to start your planning.
Here’s a simple breakdown of the zones and what they generally mean for your garage:
How to Find Your Climate Zone Quickly
You don’t need to guess your zone. I always use the U.S. Department of Energy’s Climate Zone Map. It’s an interactive map online where you can click your county.
For a guaranteed answer, a quick call to your city or county building permit office is the best move. They can tell you your exact zone and often provide the specific insulation R-value codes for garages in your area.
If you’re just in the early planning stages, simply knowing if you’re in a “hot,” “cold,” or “mixed” zone is enough to begin comparing insulation types and their potential costs. The exact number comes later.
Garage Wall Insulation: Recommended R-Values Zone by Zone

Let’s get straight to the numbers. The right R-value for your garage walls depends almost entirely on which of the eight Department of Energy climate zones you live in. I group them because the recommendations overlap and it makes planning simpler. I’ve worked on garages from Arizona to Minnesota, and following these zone-based rules prevents you from wasting money on over-insulating or dealing with a space that’s miserable to work in because it’s under-insulated. Material choice—fiberglass, mineral wool, or spray foam—also affects the practical R-value you’ll get in a garage. When planning, weigh both your climate zone and the insulation material to maximize comfort and efficiency.
Typical Wall R-Values for Hot to Mixed Climates (Zones 1-4)
This covers the southern half of the U.S. and milder coastal areas. Here, your main goal is keeping summer heat out. For standard 2×4 framed walls (which give you a 3.5-inch cavity), the standard recommendation is R-13 to R-15. A high-quality R-15 fiberglass batt, like those from Owens Corning or Knauf, fits this cavity perfectly and does the job. In these zones, using R-13 insulation is good for garage walls and is considered the effective minimum for modern energy standards. Now, you might find older rolls labeled R-11 or R-12. Are they good for a garage? In Zones 1 or 2 for a basic detached garage, an R-11 batt will provide a basic barrier, but it’s below modern code recommendations for new work. I would not use it on an attached garage or in Zones 3-4. An R-12 batt is a marginal upgrade. My advice: skip the old stock and go for R-13 or R-15 batts. They’re easy to find, cost-effective, and you won’t second-guess your work later. For garages, the garage wall door insulation guide offers door-area tips and best practices.
Typical Wall R-Values for Cold to Very Cold Climates (Zones 5-8)
Once you get into the northern states and mountain regions, the game changes. Keeping heat in during long winters is the priority. The target jumps to R-19 to R-21 for your walls. A standard 2×4 wall cavity can’t hold enough material to hit this mark alone. You have two main paths here. The first is to build your walls with 2×6 studs, creating a 5.5-inch cavity. This neatly fits a standard R-19 or R-21 fiberglass batt. The second method, which I’ve used in retrofit projects, involves installing 1-inch or 2-inch rigid foam panels (like Thermax or GPS) directly over the studs, then adding your drywall. This adds a continuous thermal break and boosts the overall wall R-value. In these cold zones, R-13 insulation is not good for garage walls as a standalone solution; you need the higher thermal resistance of R-19 or better to manage condensation and heating costs. In my own Zone 6 garage, I used 2-inch rigid foam over the studs combined with standard batts, and the difference in winter warmth was immediate.
Garage Ceiling and Attic Insulation R-Values
This is where homeowners often make a costly mistake. Heat rises, so your ceiling needs a stronger thermal barrier than your walls, regardless of your climate zone. The recommendations are much higher, and they depend heavily on what’s above your garage ceiling: is it just an empty attic space, or is it the floor of a living room?
When Your Garage Ceiling is the Floor for Something Else
This is the most critical scenario. If your garage is attached and you have a bedroom, kitchen, or living room above it, your ceiling insulation is a primary firewall and noise barrier. The International Residential Code (IRC) treats this differently. You need a minimum of R-30 for ceilings in this configuration, and in cold climates (Zones 5-8), I strongly recommend aiming for R-38 to R-49. This often requires a combination of materials. I start with a layer of R-19 or R-21 unfaced batts installed between the ceiling joists. Then, I run another layer of batts perpendicular over the top of the joists to reach the total R-value. Air sealing is absolutely non-negotiable here. Before installing a single batt, I use a pro-grade caulk gun and a can of Great Stuff foam to seal every wire penetration, plumbing vent, and gap between the drywall and the top plate. This prevents car fumes and moisture from ever reaching the living space.
For a detached garage with an unused attic space above, you can be more flexible. Insulating the ceiling is still smart for temperature control. In Zones 1-4, I’d aim for R-30 to R-38 in the attic floor. In Zones 5-8, go for R-38 to R-49. You can achieve this easily by blowing in cellulose or fiberglass insulation, which is a great DIY project with a rental machine from Home Depot. If you’re using batts, the same cross-layering technique applies. For more precise targets, see a garage insulation r values guide. It helps translate climate zones into practical attic and garage-wall R values.
Garage Door Insulation: How Much R-Value is Enough?
You often see higher R-values recommended for walls, but your garage door is a massive opening. Does R value matter in garage doors? Absolutely, it matters for comfort, condensation control, and reducing the thermal load on any heating or cooling you use in the space. A door’s R-value will typically be lower than your insulated walls, but a good door acts as a critical thermal break. Garage door insulation ratings, including R-value and U-factor, help quantify that performance so you can compare models. Knowing these ratings will make it easier to choose a door that minimizes heat loss.
When clients ask me “is 6.5 r-value good for garage door,” my answer depends on their location and goals. In many areas, an R-6.5 polyurethane-insulated door is a solid, standard upgrade from a thin, uninsulated door. It cuts down on noise and stops a lot of heat transfer. For a basic workshop or storage space, it’s often sufficient. The real question for homeowners is “is higher r-value garage door worth it,” which comes down to how you use the garage and your local weather extremes.
Garage Door R-Value Recommendations by Climate
I use a simple zone guide based on the International Energy Conservation Council (IECC) climate zones. This isn’t just theory; I’ve felt the difference on job sites from Arizona to Minnesota.
- Zones 1-3 (Hot-Humid, Hot-Dry, Warm): Aim for R-6 to R-9. The primary goal here is reflecting solar radiant heat. A door with a reflective foil backing and polystyrene insulation (often R-6 to R-8) does a great job. I’ve installed Clopay doors with these specs in Texas, and they make a noticeable difference in garage temperature.
- Zones 4-5 (Mixed-Humid, Mixed-Dry, Cool): Look for R-12 to R-16. This is where you really benefit from polyurethane foam-injected doors. The foam expands to fill the entire door section, providing better insulation and structural rigidity.
- Zones 6-8 (Cold, Very Cold): R-16 and above is the target. In these zones, your garage door is a major weak point. A high R-value door, like an Amarr Classica with an R-17.2 rating, seriously reduces frost build-up on the interior and keeps a heated garage much more efficient.
Let’s talk real-world feel. An old, single-layer steel door has practically an R-0 rating. On a cold day, it feels like a block of ice, and condensation drips off it. A standard R-6.5 door feels solid, not cold to the touch, and drastically cuts drafts. A high-performance R-16+ door feels like an exterior wall; you lose almost all sense of the outside temperature through the door itself.
Upgrading an Existing Door: Kits vs. Replacement
If you have an uninsulated door, you have two paths: a retrofit kit or a new door. I’ve tried both.
Insulation Kits (like the ones from Frost King): These are vinyl-backed foam panels you cut and fit into the door sections. Pros: They are a low-cost DIY project that adds mass, reduces drumming noise, and provides a modest R-value boost (usually to about R-4). Cons: The fit is rarely perfect, and the achievable R-value has a hard ceiling. It’s a band-aid, not a cure.
New Pre-Insulated Door: This is the permanent solution. You get a designed system with a continuous thermal break, robust seals, and a known, high R-value. The cost is higher, but for a daily-use garage, especially an attached one, it’s the upgrade I recommend. A kit improves what you have, but a new door transforms the envelope of your garage.
Special Considerations: Attached vs. Detached Garages
The rules change depending on your garage’s relationship to your house. I treat them as two different projects.
For an attached garage, I always advise insulating to a standard close to your home’s walls. Why? First, energy efficiency. A cold garage sucks heat from your living space through the shared wall. Second, and just as important, are fire codes. Many codes require a fire-rated separation, and certain insulation materials help meet that. Think of your attached garage not as a shed, but as a buffer zone for your home that needs proper management.
For a detached garage, you have more flexibility. If it’s only used for storage and you don’t plan to heat it, you can often use a lower R-value, like R-13 in the walls. But if it’s a workshop where you’ll run a heater, insulating to the same level as an attached garage (R-13 to R-21 walls, R-30+ ceiling) is a wise long-term investment in comfort and lower operating costs.
The Critical Step for Attached Garages: Air Sealing
I can’t stress this enough. The best insulation in the world is useless if air is flowing right around it. Sealing air leaks between your garage and house is non-negotiable and often more impactful than a slight R-value bump. Before you even look at insulation, grab a caulk gun and a can of fire-rated expanding foam. Address how to improve garage door seal insulation by replacing worn weatherstripping and installing a solid bottom seal to stop drafts at the source. It’s a quick, high-impact step to tackle before you move on to other insulation upgrades.
Here’s where I start on every job:
- Wall Bottom and Top Plates: Where the framed wall sits on the foundation and meets the ceiling, there are often giant hidden gaps. I use Great Stuff Fireblock Foam to seal these. It expands to fill irregular spaces and is code-approved for this fire-blocking application.
- Service Door and Garage Door Seals: Replace worn, brittle weatherstripping. For the man-door into the house, install a quality door sweep and ensure the jamb seals are tight.
- All Penetrations: This is the big one. Every wire, pipe, cable, or duct that goes through the wall or ceiling into the house needs to be sealed. I use fire-rated caulk or foam for small gaps around wires and special fire-stop putty pads for larger holes around pipes.
This sealing work is dirty and detailed, but it stops carbon monoxide, fumes, and unconditioned air from entering your home. It’s the foundation of a safe, efficient garage.
Your Garage Insulation Project Plan: Cost, Tools, and Installation

Now that you know the target numbers for your zone, let’s talk about the real-world work. This section covers what you’ll spend, what you’ll do, and what materials will get you a result that lasts.
Cost & Budget: Good, Better, Best Price Tiers
For a standard two-car garage (walls and a flat ceiling), your material costs will swing widely based on your choice. Think of these tiers in terms of performance and durability for your garage.
The “Good” tier is your basic fiberglass batt insulation, which gets the job done for an average cost of $0.50 to $1.50 per square foot. It’s the budget-friendly choice I’ve used in dozens of dry, finished garages where the main goal is simple temperature moderation.
The “Better” tier uses rigid foam boards or mineral wool batts, costing roughly $1.00 to $3.00 per square foot. This is my go-to for garages that see more moisture, house a workshop, or are in very cold climates. The foam boards are fantastic for adding a continuous thermal layer over studs.
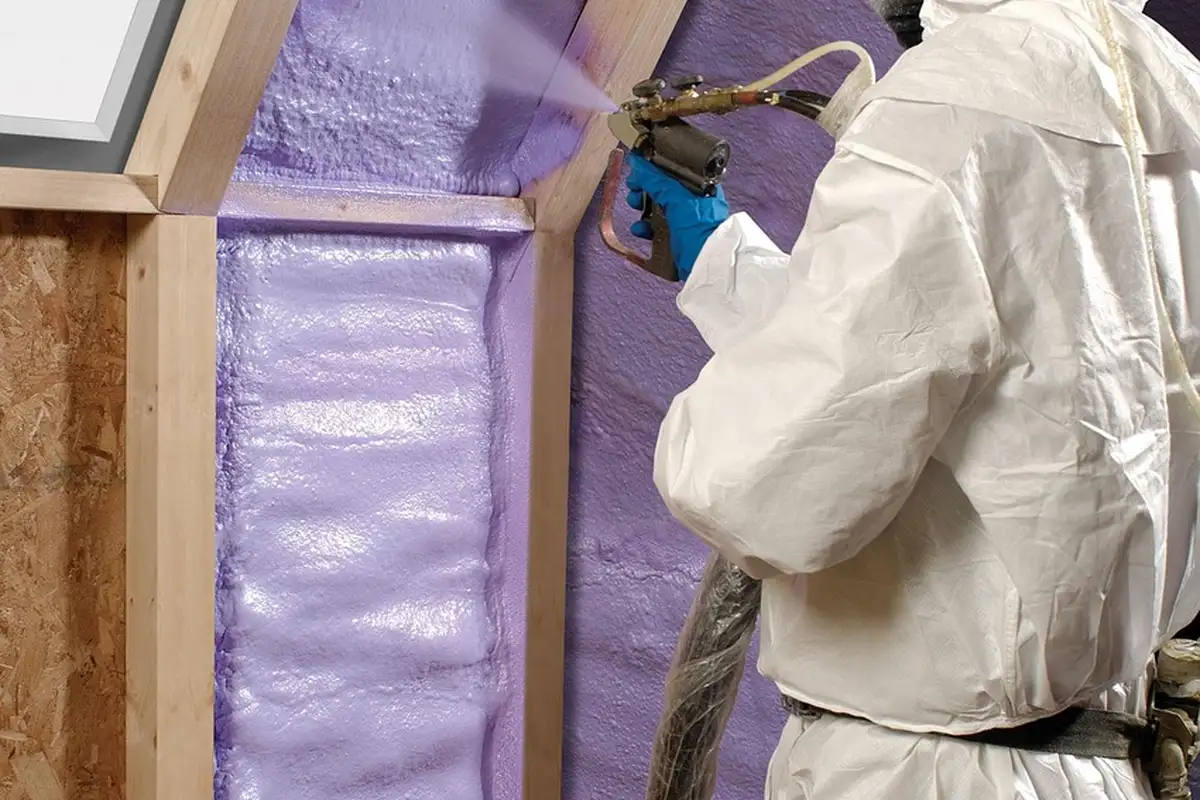
The “Best” tier is professionally installed spray foam or high-performance DIY kits, which can range from $2.50 to $6.00 or more per square foot. This creates an unmatched air seal and high R-value per inch, perfect for converting the space into a conditioned room or workshop. I save this for projects where the garage is truly becoming part of the living space.
Remember the hidden costs. You’ll need a sharp utility knife, a sturdy staple gun for batts, and a good tape measure. Never skip safety gear: a proper respirator (not a dust mask) and heavy gloves are non-negotiable. Add in trash bags for scraps and, if you’re doing loose-fill in an attic, factor a $60 daily rental for an insulation blower.
Ease of Installation: Difficulty Rating and Time Commitment
Not all insulation is equally DIY-friendly. Here’s how I’d rate them based on teaching homeowners.
Fiberglass or Mineral Wool Batts: Difficulty 4/10. It’s mostly measuring, cutting, and fitting. The active work for walls and ceiling takes one solid weekend for two people. Drying time is zero, so you can close up the walls right away. You absolutely want a helper for the ceiling work; handling long, floppy batts overhead alone is frustrating and unsafe.
Rigid Foam Panels: Difficulty 5/10. Cutting the foam neatly with a fine-tooth saw or sharp knife takes a steady hand. The time is similar to batts, but the sealing process is critical. You must meticulously tape all seams with quality foil or foam-board tape. Waiting time is minimal.
Two-Part Spray Foam Kits: Difficulty 7/10. The application is messy and the chemicals are serious. If you rush or mix incorrectly, you can create a costly, uneven mess that’s hard to fix. Active work might be one day, but you must plan for a full 24 hours of curing time before you can trim it or work near it. I recommend a helper just to manage hoses and cans.
Recommended Product Categories for a Pro-Grade Job
You have four main choices. Each has a place in garage work.
Fiberglass Batts are the familiar pink or yellow rolls. They’re easy to cut with a knife and fit between studs. The downside is they can sag over time if not supported, and they offer zero moisture resistance. They meet lower R-values well but require more depth for higher numbers.
Mineral Wool Batts are denser, often gray blocks. I like these for garages because they are fire-resistant, cut cleanly with a serrated bread knife, and don’t absorb water. They’re heavier and cost more, but their performance around garage electrical boxes is superior.
Rigid Foam Panels (XPS or EPS) are the pink or blue boards. Their biggest pro is high R-value per inch and inherent moisture resistance. Use these when you need high R-values in thin spaces, like on garage doors or over foundation walls. You must seal every seam with specific tape to act as a vapor barrier in cold climates.
Spray Foam (open or closed cell) is applied as a liquid. It expands to fill every crack, providing both insulation and an air barrier. Closed-cell foam also adds structural rigidity and is a vapor barrier. It’s the ultimate performer but requires the most skill and safety precautions to install correctly.
Installation Dos and Don’ts I Learned the Hard Way
Follow these tips to avoid my early mistakes.
- Do wear a tight-fitting P100 respirator, goggles, gloves, and coveralls. Insulation fibers and foam chemicals are no joke. I learned this after a day of itchy arms and a cough.
- Do check your local building code. Most require garage walls and ceilings sharing the house to be covered with fire-rated drywall over the insulation.
- Do cut insulation precisely. For batts, I cut them about an inch wider than the cavity so they friction-fit snugly without being compressed.
- Don’t block the soffit vents if you’re insulating the ceiling. Use baffles to maintain airflow from the soffit into the attic space. Trapping heat and moisture there causes rot.
- Don’t leave gaps. Gaps at edges, around windows, or behind wires create thermal bridges where heat flies right out. Stuff small pieces into those odd spaces.
- Do address wiring and boxes. Tear batts to fit neatly around electrical boxes, and never bury a junction box. Keep insulation behind wires, not pinching them.
Garage Insulation R-Values: Your Quick-Answer FAQ
I know my climate zone. How do I check what R-value is already in my garage walls?
Find an inconspicuous spot, like behind an outlet cover (power OFF first), and peek into the wall cavity with a flashlight. You’re looking for batt thickness or foam boards. For a finished ceiling, you’ll need to access the attic; measure the depth of the insulation and identify the material for a rough R-value estimate.
Is insulating the garage ceiling more important than the walls?
Yes, prioritize the ceiling. Heat rises, making it the biggest escape route. In an attached garage, a well-insulated ceiling is also critical for fire separation and noise blocking. Ensure it’s properly air-sealed before adding insulation to be effective. That’s why insulating the garage ceiling is a key next step. The following steps will show you how to insulate the garage ceiling for best efficiency and safety.
My garage is already drywalled. Is it worth tearing it down to add insulation?
For a detached, storage-only garage, probably not. For an attached garage or a heated workshop, it can be a worthwhile investment. As a pro, I often use dense-pack cellulose or injection foam blown into the walls through holes-minimal demolition for a major upgrade.
Can I just add more insulation over my old, thin garage door?
You can use a retrofit kit, but it’s a band-aid. The R-value gain is limited (typically to ~R-4), and the door’s structure remains a weak point. For daily use or in cold climates, investing in a new, properly insulated door (R-12 to R-18+) is a more durable and effective solution.
How noticeable is the real-world difference between, say, R-13 and R-19 in garage walls?
In a cold climate, you’ll feel it. R-13 walls will feel cold to the touch and allow more heat loss, making a space heater work harder. R-19 walls maintain a more stable, comfortable temperature and significantly reduce condensation and drafts.
I’m hiring a contractor. What’s the one question I should ask about garage insulation?
Ask: “What is your process for air sealing before installing the insulation?” If they don’t mention sealing top/bottom plates, wires, and penetrations with caulk or foam, they’re missing the most critical step for performance and safety, especially in attached garages.
Final Thoughts on Insulating Your Garage
The single most important step is matching your insulation’s R-value to your local climate zone. From my experience installing insulation in dozens of garages, getting this right is what turns a space from unusable to comfortable. Keep these points in mind:
- Use the DOE climate zone map as your starting guide, not your only source.
- Your local building code office is your best resource for the final number.
- Think beyond just the R-value; proper air sealing and vapor barriers are just as critical.
- Always check code for any required ignition barriers over foam board products.
Evan Gunther
Evan is a general contractor operating in Columbus, Ohio servicing, maintaining and building residential and commercial garages for over two decades. He has personally redeveloped over 100+ garages and installed and reinstalled over 230+ garage doors in his long tenure. When it comes to giving your garage a face lift or fixing common issues, Evan's the pro. Feel free to reach out to him and follow his Garage Log blog for expert, fact based advice.