
What Are the Standard Dimensions and Square Footage for a Three-Car Garage?
Building a three-car garage can leave you guessing about the right size to fit your daily drivers and workshop tools. I will share the exact measurements I rely on from my garage builds to ensure you have a solid starting point.
This article walks you through common width and depth benchmarks, how to compute total square footage, and critical adjustments for storage and vehicle clearance.
My advice comes from over ten years of hands-on garage construction and maintenance, where I’ve tailored spaces for everything from compact cars to full-size trucks.
The Raw Measurements: Width, Depth, and Total Square Footage
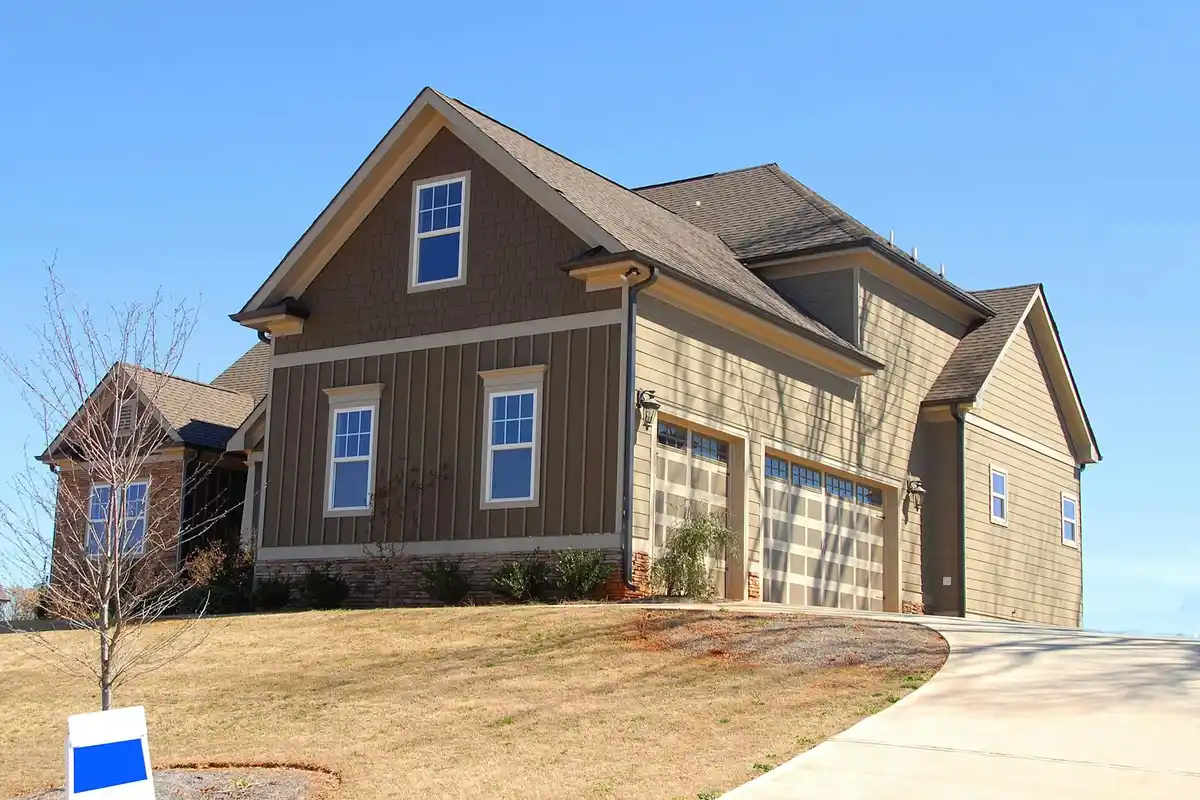
Most production home builders will frame a three-car garage to a width between 32 and 36 feet and a depth from 20 to 24 feet. I’ve seen plenty in that range when it comes to garage wall framing.
Let’s do the math on a common middle-ground size: 32 feet wide by 22 feet deep. You multiply those together (32 x 22) to get 704 square feet. That’s a solid, average number to have in your head.
To answer “how big is a 3 car garage in square feet,” picture a decent one-bedroom apartment or a large open-concept living room. You’re dealing with a space that’s typically between 640 and over 800 square feet. The exact number swings based on your depth. This size also lends itself to a garage bedroom living space conversion, blending sleeping and living areas. If you’re exploring such a conversion, these dimensions provide a practical baseline.
Why that range? It all comes down to what’s parked inside. A line of three Honda Accords needs less room than two Ford F-150s and a minivan. I’ve helped clients reorganize garages where the trucks literally touched side mirrors. The modern shift to wider SUVs and trucks is pushing these standard dimensions to their limit.
How a 3-Car Garage Stacks Up Against a 2-Car Garage
The difference in floor space is more dramatic than most people realize. A typical how big is a 2 car garage sq ft answer is 400 to 500 square feet. Compare that to our 600 to 900 square foot range for a three-car.
You’re not just adding 50% more car space. You’re often doubling your total usable area. This is the real value of understanding how big is a 3 car garage compared to a two-car.
In practice, that extra 200-400 square feet changes everything. It’s the difference between squeezing a workbench into a corner and having a dedicated 8-foot bench with tool storage behind it. It’s space for a full-sized refrigerator, freestanding shelves for holiday decor, or a wall for bikes without blocking a car door. The third bay often becomes a multi-purpose utility and project area.
Minimum Workable Size vs. Comfortable Living Size
You can technically fit three cars in a space as tight as 30 feet wide by 20 feet deep. That’s 600 square feet. I call this the “parking lot” spec. The cars will fit with only inches between them, and you’ll have to enter through the rear hatch or climb out a sunroof.
Building to the minimum creates a garage you’ll hate using. It becomes a claustrophobic storage closet for cars, not a functional part of your home.
For a garage you can actually live with, I recommend aiming for what I call the “comfortable living” size. Go for at least 34 feet wide by 22 feet deep (748 sq ft). This gives you roughly a 10-foot width per car bay, plus a crucial 4-foot buffer zone down the middle or along the walls. If you’re planning a two-truck setup, think in terms of two side-by-side bays. That typically means about 20 feet of width for the bays, plus the buffer and room to move around.
That buffer is everything. It’s where you open a door without dinging the next car. It’s where you can walk through with groceries. It’s the space that lets you use your garage as more than just a vault for vehicles.
Planning for Reality: Space for Cars, Storage, and You

When you ask about dimensions, you’re really asking about function. A number on a blueprint doesn’t tell you if you’ll be able to open your car door without dinging your workbench. My goal is to translate common garage dimensions into real-world, livable space you can actually use. Let’s start with the machines this building is named for.
The Space Three Cars Actually Need
Forget the car’s listed width. You need to plan for the doors. A midsize sedan is about 6 feet wide. A full-size truck or SUV can push 6.5 to 7 feet. In my shop, I work with a simple formula: car width plus 2.5 feet per side.
- For a 6-foot-wide car: 6 ft + 2.5 ft (left) + 2.5 ft (right) = 11 feet of clear floor space.
- For three 6-foot cars: 11 ft x 3 = 33 feet of total width needed just for parking.
That 2.5 feet per side is your door swing and a small safety gap to the wall or the next vehicle. If you skimp here, you’ll be doing the “garage shuffle,” climbing out of a cracked door every single day.
Depth is just as critical. An average car is about 15-17 feet long. Your garage needs to be deeper. I always recommend a minimum of 22 feet of interior depth from the garage door to the back wall. It’s important to ensure your garage meets the length and depth requirements to accommodate your vehicle and provide extra space for storage and movement.
- This gives you about 2-3 feet of bumper clearance in front of the car.
- It leaves 2-3 feet of walking space behind it, which is vital for accessing a rear hatch or trunk.
So, for three cars parked side-by-side, the bare minimum starting point is often a 33′ wide by 22′ deep footprint. That’s 726 square feet just for parking.
Building in “Breathing Room” for Storage and Work
A garage that only fits cars is just a covered driveway. The magic happens in the leftover space. You must intentionally design zones for storage, tools, and movement, or clutter will take over.
The most important feature is the work aisle. This is the main walkway behind the parked cars. I will not design a layout with less than 4 feet of clear aisle width. Three feet feels cramped with a tool cart; 4 feet lets you move materials and work comfortably.
For wall storage, think vertically. A bank of upper cabinets, like the Gladiator GearWall panels I use, keeps things off the floor. But you need space for the stuff that lives down low:
- A full-size tool chest is about 30 inches deep.
- A standard workbench is 24 inches deep.
- Floor-standing shelving units are 18-24 inches deep.
You need to account for this depth on at least one long wall. If your back wall is 22 feet away from the door, and your car is 17 feet long, you have a 5-foot zone. A 24-inch deep bench leaves you with over 3 feet of aisle in front of it. That works.
A Sample Layout with Storage Zones
This is the most common question I get: “Can I fit three cars AND have storage?” Yes, but you must be smart about the square footage. Let’s plan for a practical 36′ x 24′ garage (864 sq ft).
Picture this layout as you read:
- Parking Zone (Left Side): Three 11-foot wide bays fill the 33-foot width. Cars park here, each with proper door-swing clearance.
- Work & Aisle Zone (Center Rear): The 4-foot deep aisle runs the full width behind the cars. This is your main circulation path.
- Tool Zone (Back Wall, Center): In the middle of the back wall, place a 6-foot long, 24-inch deep workbench. Above it, install slatwall for hanging tools.
- Bulky Storage Zone (Back Wall, Sides): Flank the workbench with 24-inch deep heavy-duty shelving units. This is for bins, coolers, and seasonal gear.
- Long-Term Storage Zone (Right Wall): Use the entire 24-foot length of the right wall for overhead storage racks and lower cabinets. This wall is gold because it’s not interrupted by a vehicle door.
This zoning approach creates dedicated homes for everything, which is the only way to maintain a functional three-car garage long-term. The leftover 3 feet of width (from our 36′ total) gives you a little extra wiggle room on the sides for wall thickness and that critical buffer zone so you never feel pinched.
Don’t Forget the Third Dimension: Ceiling Height Standards
When people plan a garage, they often focus on floor space and forget to look up. The standard ceiling height for many builds is 8 feet. Builders use this because it’s the minimum in many building codes and it keeps material costs down for trusses and drywall.
If you’re building new, I strongly advise you to plan for more than 8 feet. A higher ceiling of 10 to 12 feet completely changes what your garage can do for you.
Why a Higher Ceiling is a Smart Investment
That extra airspace above your cars isn’t wasted. It’s functional space waiting to be used. Here’s what it allows:
- Vehicle Lifts: A two-post or four-post lift needs clear height. Most require at least 10 to 12 feet to safely lift a vehicle for maintenance or to park a second car underneath.
- Overhead Storage: Rack systems from brands like Racor or Gladiator let you store bulky, seasonal items-like Christmas decorations or camping gear-completely out of the way. You need headroom to install them and still walk underneath.
- Better Air & Light: A taller space feels less cramped, improves ventilation, and gives you more wall height for windows or taller cabinet units.
A Lesson from My Garage: The Kayak Hoist
I learned this one the hard way. In my first garage, I had an 8-foot ceiling. I bought a nice pulley hoist system to store my kayak overhead. After I installed it, the kayak hung so low that I was constantly ducking underneath it, and I couldn’t park my SUV in that bay without the roof rack hitting the kayak. It defeated the whole purpose.
When I built my next garage, I insisted on 11-foot ceilings. Now, I use a Heavy Duty Harken Hoist for the kayak-it’s mounted high enough that the boat clears my truck by a full two feet. The difference is night and day. That experience taught me to always plan for the future uses you haven’t even thought of yet.
Upgrading trusses for a higher ceiling during construction is a straightforward job for your builder. Trying to raise a ceiling after the fact is a massive, expensive project. Think vertically from the start.
Three-Bay Garage Layouts: Side-by-Side, Tandem, and L-Shaped

Once you know your overall square footage, the next big decision is how to arrange that space. The layout changes how you use the garage every single day. I’ve worked in hundreds of garages, and the right layout feels spacious, the wrong one feels cramped forever. This is especially true when considering garage layout for parking capacity.
The Classic Side-by-Side
This is the layout most people picture. It’s three doors, each leading to its own equally sized bay. Think of it like three standard one-car garages built in a row.
- A typical 36’x24’ garage gives you three 12-foot-wide bays.
- This is a straightforward, efficient use of space for parking.
The side-by-side layout is the standard for a reason: it’s predictable, easy to build, and makes parking three vehicles simple. You won’t be shuffling cars around to get one out. The downside is it leaves you with three long, narrow strips of wall space. It can be tricky to fit a large workbench or a full set of cabinets without one bay becoming dedicated storage.
The Tandem (or 2-Deep) Layout
Instead of three doors, you often see two. The first bay is standard depth, but the second bay is extra deep, designed to park two cars one behind the other.
- A common plan is 32’x24’, with one 16’x24’ deep bay and two standard 16’x24’ bays side-by-side in front of it.
- The deep bay is perfect for a daily driver parked behind a classic car or boat you only use seasonally.
This design has a major trade-off. The tandem layout maximizes parking on a narrower lot, but it turns your third car into a “captive” vehicle you must move to access. I’ve seen this work well for families with a project car, but it can be a daily hassle if all three cars are used equally. It also creates one very long, uninterrupted wall perfect for a workshop setup.
The L-Shaped Design
This is a smart way to carve out dedicated space. Imagine a standard two-car garage box, with a third bay extending off one side, forming an “L”. This creates a protected nook.
That nook is ideal for a workshop because it’s separated from the main parking area. You can leave a project out without blocking a parking spot. An L-shaped garage gives you a clear zoning advantage, separating messy work from clean parking, but it requires more land and a more complex foundation. I helped a client set up his L-shaped nook with Gladiator Gearwall panels for tools, and it kept all the sawdust away from the family vehicles.
Cost & Budget: From Basic Shell to Finished Workshop
Once you know the footprint you want, the next big question is cost. Your final price swings wildly based on how you build it and, just as importantly, what you put inside it. I’ve helped clients finish everything from a bare-bones storage shed to a fully climate-controlled hobby shop. Here’s how I break down the typical price tiers.
The “Good” Budget: A Basic DIY Shell
This is for the hands-on homeowner. The “Good” budget gets you a dry, secure structure, but you’re responsible for most of the labor. A pole barn-style garage is your friend here. These kits use pre-engineered steel frames and siding, which are surprisingly DIY-friendly if you’re comfortable with basic tools and have a few strong friends.
You’re looking at a significant material cost, but you save a massive amount on labor. For a basic 36’x24′ three-car shell, expect to pay between $18,000 and $30,000 just for the kit materials. That typically includes:
- Steel frame and roofing/siding panels.
- All necessary fasteners and trim.
- An overhead door (often a basic, non-insulated model).
This price does not include the concrete slab, which is a separate and major expense. It also assumes you have the tools. You’ll need a good drill/driver kit (I’ve worn out several DeWalt 20V models), reliable ladders, and ideally a pneumatic nailer for any interior sheathing.
The “Better” Standard: Contractor-Built & Usable
This is the most common path. You hire a reputable garage builder, and they handle the entire structure from the ground up. You’re paying for skilled labor, code compliance, and a finished space you can actually use year-round. For that same 36’x24′ footprint, the contractor-built garage cost range for standard finishes is typically $45,000 to $65,000. Costs naturally scale with the size of the project. So increasing the footprint will raise the total price, even with standard finishes.
This price tier generally gets you:
- A professionally poured, reinforced concrete slab.
- Stick-built wood framing with OSB sheathing.
- Asphalt shingle roofing.
- Vinyl siding to match your house.
- Basic insulation in the walls (often R-13 fiberglass batts).
- A decent insulated garage door with a belt-drive opener (I consistently recommend LiftMaster for their reliability).
- Drywalled and painted interior walls.
- Basic electrical with a handful of outlets and ceiling lights.
It’s a turnkey shell. You can park your cars and store your lawn tools comfortably, but it’s not a refined workshop yet.
The “Best” Investment: A Custom Finished Space
Here’s where your garage becomes a true extension of your home. This tier is for the enthusiast who wants a showroom, a workshop, or a perfect hobby space. Custom finishes and systems add cost quickly, but they also add immense daily value and can improve your home’s resale appeal. Budgets here start around $75,000 and easily exceed $100,000.
This is where you add the features that make the space a joy to use:
- Epoxy Floor Coating: A professional-grade 100% solids epoxy floor (like what I use from Legacy Industrial) is durable, easy to clean, and brightens the space. DIY kits often fail; this is worth hiring out.
- HVAC System: A dedicated mini-split system (like a Mitsubishi or Mr. Cool) lets you control temperature and humidity. This protects tools, vehicles, and your own comfort.
- Premium Storage: Built-in cabinets and slatwall systems. I’ve installed NewAge Pro series cabinets in my own shop-they hold up better than stainless steel against dings and chemicals.
- Enhanced Electrical: A sub-panel with dedicated 220V circuits for welders or car lifts, and abundant LED lighting.
- Upgraded Insulation: Spray foam in the roofline (R-38) and upgraded wall insulation for serious temperature control.
Don’t Forget the Hidden Costs
I’ve seen too many budgets derailed by surprises. The structure itself is only part of the story; the site work and permits are fixed costs you can’t avoid. Always factor these in from the start.
- Site Preparation: If your yard isn’t level, you’ll need excavation and grading. Removing trees or old structures costs extra.
- Concrete Work: The slab is a major line item. Thickness, reinforcement (rebar or wire mesh), and finishing all affect the price. A basic 4-inch slab is a minimum; go thicker if you plan for heavy tools or a lift.
- Permit Fees: Your local building department will charge for permits and inspections. This isn’t an area to skip-it ensures your garage is built safely and to code.
- Utility Runs: Extending electrical service from your main house panel or running a new gas line adds cost per foot.
- Dumpster & Debris Removal: For a tear-down and rebuild, you’ll need a dumpster for the old materials. Even for a new build, there’s significant packaging and scrap to haul away.
Maintenance & Cleaning Routine for a Large Garage Space
Keeping a three-car garage clean is less about constant effort and more about a smart system. The extra square footage can feel overwhelming, but a simple, consistent routine prevents it from becoming a weekend-long chore. I rely on a three-tiered approach: monthly, seasonal, and annual tasks. This schedule breaks the work into manageable chunks and keeps your garage functional and safe all year.
The Simple Monthly Sweep
Forget the broom. In a large space, sweeping just pushes dust and small debris into the air and into the cracks of your floor. Every month, I take 15 minutes with my heavy-duty shop vacuum. I use a DeWalt corded model because it has the power to suck up everything from dry leaves to spilled potting soil without clogging.
Here is my fast process:
- Move any small, portable items like trash cans or floor jacks out of the way.
- Use the wide floor nozzle and make slow, overlapping passes. Focus on high-traffic areas near the doors and in front of workbenches.
- Switch to the crevice tool to quickly clean the track for your garage door rollers. Built-up grit here is a common cause of door problems.
This monthly vacuuming stops abrasive dirt from grinding into your concrete floor’s sealer and keeps the general dust down, which is better for your tools and your car’s interior.
The Seasonal Deep-Clean: Degreasing the Floor
I do a full floor clean twice a year, typically in spring and fall. Oil drips, road salt, and general grime build up and can stain the concrete or make it slippery. For this job, you need a cleaner that breaks down grease, not just masks it. I’ve switched almost entirely to bio-enzyme cleaners, like the Simple Green Pro HD series. They use natural bacteria to digest oils and are much safer to handle and rinse away than harsh acids.
My deep-clean steps are straightforward:
- Remove everything you can from the floor. A clear floor is a cleanable floor.
- Sweep thoroughly to remove all loose dirt the vacuum might have missed.
- Apply the bio-enzyme cleaner as directed. I use a garden sprayer for an even coat. Let it dwell for 10-15 minutes to break down the stains.
- Scrub with a stiff-bristle push broom. For tough spots, a handheld deck brush gives you more pressure.
- Rinse extensively with a hose. Proper rinsing is key; any leftover cleaner can leave a hazy film. I push the water out the main door with a squeegee.
Using a bio-enzyme product means you are not just washing grease into the driveway or storm drain; you are safely breaking it down, which is better for your local environment.
The Annual Safety & Integrity Checklist
Once a year, set aside an hour for a proactive inspection. This is not about cleaning, but about preventing costly repairs and ensuring safety. I always do this during my fall deep-clean when I already have everything cleared out.
My annual checklist has three focal points:
- Inspect Garage Door Springs and Hardware: With the door closed, look at the torsion springs above the door. Do you see any gaps between the coils? That means they are wearing out. Never attempt to repair or adjust garage door springs yourself; the stored energy is extremely dangerous. This is a visual check only. Also, listen for grinding or squeaking during operation and check that all roller brackets are tight.
- Tighten Wall-Mounted Hardware: Go around and check every shelf bracket, slatwall panel, and cabinet that is screwed into the walls. Over the year, vibration can loosen them. I use a simple cordless drill with a Phillips bit to snug up any loose screws. This prevents a heavy shelf from suddenly pulling free.
- Check for Moisture and Pests: Look along the bottom of all walls for signs of water staining, especially after you rinse the floor. Check the sealing around your service door and windows. Look for rodent droppings or insect nests in corners and on top of stored items. Catching these issues early saves huge headaches later.
This annual walk-through is the most valuable hour you will spend in your garage, as it lets you spot small problems before they become major projects.
Log Entry: The “Above the Door” Storage Hack

Most garages have a decent amount of wall and floor space. But the real pro-level storage area is right above your head, in that long, shallow void created when the garage door opens. Think of it as extra garage storage space for household items you only use occasionally. With proper planning, it keeps clutter off the floor and frees up your main work areas.
When your door is up, look at the space between the top of the door panel and the ceiling. That’s 12 to 18 inches of depth that’s almost always empty. This dead space is perfect for shallow, wide shelving to store long, flat items you rarely need, like storm window inserts, spare lumber, or wrapping paper tubes.
Building a Simple Shelf for the Space
You don’t need a fancy kit. I build these with common framing lumber. For a standard 16-foot wide door, I use:
- (2) 2x4s, 16 feet long for the front and back rails.
- (3) 2x4s, cut to 14.5 inches long for the shelf supports.
- (1) sheet of 1/2-inch sanded plywood, ripped to 14.5 inches wide and cut to length.
I prefer kiln-dried SPF (Spruce-Pine-Fir) from the lumberyard. It’s straighter and less likely to warp than the cheaper “whitewood” often found at big-box stores. For plywood, I go with BC sanded pine; it holds paint well and has a smooth face.
Here’s how to put it together:
- Locate your ceiling joists with a stud finder. Mark their centers along the wall where your shelf will go.
- Pre-drill your long 2×4 rails. Hold the first 2×4 flush against the ceiling, centered on your marks. Secure it with two 3-inch construction screws into each joist. A cordless impact driver, like my Milwaukee M18, makes this job quick without stripping heads.
- Measure down 14.5 inches from that top rail and install the second long 2×4 exactly parallel to it. Use a level. This board becomes your front lip.
- Screw your 14.5-inch long 2×4 support blocks between the rails, placing one at each end and one in the center.
- Drop in your pre-cut plywood shelf. I don’t usually fasten it; this lets you remove it easily for painting or to adjust the supports later.
A Critical Safety Check and Weight Limit
Before you load a single item, you must do this. Slowly open and close your garage door while watching the top panel. Your shelf must have at least 3 inches of clearance from the highest point the door reaches in its travel. I’ve seen doors with worn springs or older tracks that lift higher than expected.
This is shallow storage, not a heavy-duty loft. Those 2×4 rails are only held by screws in the end grain of the joists. I treat a 16-foot shelf like this with a strict 75-pound total weight limit. Only store lightweight, secure items. Use a bungee cord or a simple 1×2 stop block screwed to the shelf to prevent things from vibrating off when the door cycles. The last thing you want is a piece of trim landing on your windshield.
Your First Step: Measuring Your Lot and Navigating Codes
Before you dream about bay widths, you need a firm grasp of the dirt you’re building on. A wrong measurement here is a costly mistake later.
The only measurement that matters is your buildable area, which is almost always smaller than your total lot. You must account for mandatory property line setbacks, which your city or county dictates.
How to Measure Your Buildable Area
Grab a 100-foot tape measure or, my preference, a Bosch laser distance measurer. I use the Bosch GLM 50 C because it’s fast, accurate to 1/16 of an inch, and saves me countless steps on a large property.
- Locate your property pins. These are metal stakes at the corners of your lot, often buried under a few inches of soil or marked with caps.
- From each pin, measure inward the required front, side, and rear setback distances. Your local zoning office can give you these numbers.
- Mark these inner points with spray paint or stakes. The rectangle or shape formed by these inner points is your true buildable pad.
I once helped a client who planned a 28-foot deep garage. He measured from his house but forgot the rear setback. His plan was 4 feet into the no-build zone. Catching that saved him a major redesign after permit submission.
The Non-Negotiable: Local Building Codes
Your city’s building department holds the rulebook. Their codes trump any “standard” dimension you find online.
- Size Limits: Some areas limit total structure square footage or lot coverage percentage. A massive three-car garage could push you over the limit.
- Foundation Requirements: Code dictates frost depth for your footings. In my region, we dig 42 inches down. In warmer areas, a monolithic slab might be allowed. Getting this wrong risks heaving and cracks.
- Permit Process: You will need a permit. The application requires your site plan and construction drawings. Starting this dialogue early is key.
Your single most important call is to your local building or zoning department. Ask for the residential code requirements for detached garages. Write down the person’s name and the specifics they give you.
Bring in a Contractor Early
Even if you plan to act as your own general contractor, have a pro look at your site. A good contractor sees pitfalls you won’t.
I always walk the site with my clients. We look for:
- Drainage: Where does water flow? Building in a low spot means adding fill and complex drainage, which adds cost.
- Access: Can concrete trucks and lumber deliveries reach the site? A narrow side yard might require a pump truck for the concrete pour, which is more expensive.
- Utility Lines: Overhead wires or buried sewer lines can limit placement and height.
This consultation is worth a few hundred dollars. It can save you thousands in change orders and headaches down the line. Get quotes from two or three licensed builders. Ask to see a similar garage they’ve built and talk to that homeowner. Their practical experience is your best insurance for a smooth project.
FAQ: Standard Three-Car Garage Dimensions & Maintenance
What are the minimum dimensions I can get away with for three cars?
The absolute minimum is 30′ x 20′ (600 sq ft), but this creates a “parking lot” you’ll hate. You’ll have zero space to open doors or walk. For a functional space, never build smaller than 33′ x 22′ (726 sq ft), and always add extra width for a buffer zone. Check your actual vehicle widths plus 2.5 feet on each side to know your true minimum.
My garage feels tight. How can I quickly check if it’s undersized?
Perform this real-world test: Park all three vehicles and try to open each driver’s door fully. If you can’t do so without touching another car or a wall, your garage is undersized for comfortable daily use. The fix is rigorous decluttering of the floor and walls to reclaim every inch of aisle space.
What ceiling height should I aim for if I’m not planning a car lift?
Even without a lift, insist on a minimum 10-foot ceiling. The extra two feet above the standard 8-foot height is critical for effective overhead storage racks and better ventilation. This is a low-cost upgrade during construction that pays daily dividends in usability and storage capacity.
How much free wall space should I leave for maintenance access?
Always maintain a minimum 4-foot clear aisle behind parked vehicles. This is non-negotiable for moving tools, materials, and accessing trunks. Furthermore, ensure at least 3 feet of clear floor space in front of any workbench or shelving unit. Clutter creeping into these zones is the top cause of a non-functional garage.
Does the garage door layout (side-by-side vs. tandem) affect maintenance?
Absolutely. Tandem layouts require moving a “captive” car for access, increasing wear on that vehicle’s drivetrain from short, cold moves. For side-by-side layouts, the main maintenance focus is on the door tracks and rollers for all three doors-add checking and lubricating them to your seasonal routine.
What’s the first step if my planned storage won’t fit with three cars?
Think vertically, not horizontally. Before sacrificing floor space, plan for full-height slatwall or steel cabinets on the rear and side walls. Utilize the “dead space” above the garage door header for shallow shelving. If you’ve maxed out vertical space, you need to increase your garage’s depth, not just its width.
Final Measurements for Your Three-Car Garage
Your three-car garage’s real-world usefulness depends more on smart layout than hitting exact width and depth numbers. Start with the common 32’x22′ or 36’x24′ footprints as a baseline, but always tailor the plan to your actual vehicles and storage needs. The key things to remember are:
- Measure your largest vehicle (like a crew-cab truck or SUV) first and build your minimum clearances around it.
- Always account for storage zones, workbenches, and door swing clearance in your initial layout drawings.
- Consult your local building department early; setback and code requirements will ultimately dictate what you can build.