
How Do I Pick the Right Paint and Apply It to Renew My Garage Floor?
Looking at a dingy, stained garage floor and feeling overwhelmed by paint choices? I’ll cut through the confusion with clear, shop-tested advice to get your floor looking new.
We will cover epoxy versus polyaspartic coatings, the non-negotiable steps for concrete preparation, and my preferred application tools from brands like Rust-Oleum and Sherwin-Williams.
I’ve personally resurfaced over fifty garage floors, learning which products hold up to daily abuse and which application mistakes to avoid.
What’s Your Garage Floor’s Starting Point? A Condition Check
Before you buy a single can of paint, you need to look your floor in the eye and see what you’re really working with. I’ve seen folks skip this step, and it’s the main reason their new coating peels up in a year. Think of this like a doctor’s visit for your concrete you’re diagnosing the problems so you can prescribe the right fix.
Start with a clean, dry floor. Get down on your hands and knees with a bright work light. Look for stains, flaking, and cracks. Run your fingers over the surface. Does it feel slick and smooth, or is it rough and porous? That texture tells you a lot about any old coating.
Can you paint over an existing painted or sealed floor? Usually, it’s a bad idea. Most new coatings won’t bond properly to an old, unknown finish. You can only paint over an old coating if it’s in perfect condition, fully adhered, and you know exactly what it is. In my shop, I always recommend stripping it down to bare concrete. It’s more work upfront, but it’s the only way to guarantee a bond that lasts for years, not months.
Checking for Moisture and Old Coatings
Moisture coming up through the slab is a paint job’s silent killer. The simple plastic sheet test is your best friend here. Clean a 2’x2′ section of floor in the center of your garage, tape a clear plastic garbage bag or sheet flat to the concrete, and seal all the edges with duct tape. Wait 24 hours. If you see moisture droplets or darkening on the underside of the plastic, you have a moisture issue in the concrete. You’ll need a specialty moisture-blocking primer, not just regular paint.
To identify an old coating, do a spot test in an inconspicuous corner. First, try scraping it with a putty knife. If it flakes off in brittle chips, it’s likely a cheap latex paint. If it’s thick, rubbery, and hard to scrape, it could be epoxy. Next, put a few drops of acetone or nail polish remover on it. If the coating softens and gets tacky, it’s likely a solvent-based epoxy or sealant. A water-based paint won’t react much. This tells you how aggressive your stripping or etching needs to be.
Assessing Damage: Stains, Cracks, and Spalling
Not all damage is equal. Categorize cracks first. A hairline crack is thinner than a dime, often just on the surface. A structural crack is wider, may run deep, and the concrete on one side is often higher or lower than the other. You can fill hairline cracks yourself. Structural cracks need a professional assessment to ensure the slab is stable.
For oil stains, I’ve had great luck with a product like Oil Eater Cleaner Degreaser. Pour it on, scrub it with a stiff brush, and let it soak. You might need two or three applications for a deep stain. For cracks, the repair is part of your prep work. The key to a permanent fix is to undercut the crack, which means making the bottom of the crack wider than the top so your filler can’t pop out. I use a 4-inch angle grinder with a diamond wheel for this, then clean it out with a shop vac and a wire brush.
The No-Compromise Garage Floor Prep Plan
If I had to give one piece of advice for a perfect garage floor, it’s this: your paint is only as good as your prep. You can buy the most expensive epoxy kit on the market, but if you slap it on a dirty, smooth floor, it will fail. Prepping the floor correctly is not a step you can rush or cheat; it is the entire foundation of your project. How do you prepare your garage floor before painting? You commit to doing it thoroughly, following these steps in order—especially when using epoxy paint DIY for your garage floor.
Deep Cleaning: More Than Just a Sweep
Start by removing everything from the garage. I mean everything. Then, dry sweep and vacuum every speck of dust. For degreasing, I don’t mess around with mild soap. I use a heavy-duty concrete degreaser. Simple Green Concrete and Driveway Cleaner or Krud Kutter Concrete and Cement Degreaser work well. Follow the label directions, but generally, you mop or spray it on, let it dwell for 10-15 minutes, then agitate it with a stiff push broom or a drill brush.
Next, power wash it all away. A 2000-3000 PSI gas pressure washer is ideal for this job. You’re not just rinsing; you’re blasting loosened dirt and old cleaner out of the concrete’s pores. Let the floor dry completely for at least 24 hours, with fans and dehumidifiers running if you have them. A damp floor will ruin your etch and your paint adhesion.
How Do You Etch a Concrete Garage Floor?
Etching is the process of using a mild acid to microscopically roughen the concrete surface. Think of it as turning your smooth floor into a piece of fine-grit sandpaper so the paint has something to grip onto. You have two main choices: traditional muriatic acid or a newer, safer citric or phosphoric acid-based concrete etcher.
Muriatic acid is cheaper and very effective, but it’s dangerous. It fumes terribly and can burn skin and lungs. I only use it with full safety gear: chemical-resistant gloves, goggles, a respirator with acid gas cartridges, and long sleeves in a well-ventilated space. For a safer, user-friendly option, I’ve used Behr Presto Clean Etch with good results. It’s less volatile and easier to handle for a DIYer.
Here are the safe steps for acid etching a garage floor:
- Put on all your Personal Protective Equipment (PPE).
- Dilute the acid according to the product’s instructions in a heavy-duty plastic watering can. Always add acid to water, never water to acid.
- Working in small sections, sprinkle the solution evenly across the dry concrete. It will immediately start to fizz and bubble.
- Scrub the area with a stiff acid-bristle broom to work it in evenly for 5-10 minutes.
- Once the fizzing stops, thoroughly rinse the section with your pressure washer before moving to the next area. You must neutralize and remove all acid residue.
- When the entire floor is done, do a final rinse. The concrete should have a uniform, dull, lightly textured appearance, like medium sandpaper.
Repairing the Canvas: Fixing Cracks and Holes
After etching and another full dry cycle, you can make your repairs. For hairline cracks, a flexible polyurethane caulk like Sikaflex Self-Leveling Sealant works. For wider cracks and holes, you need a rigid, hydraulic cement-based patch. I rely on products like Rapid Set Cement All or Quikrete Vinyl Concrete Patcher.
The process is straightforward but detail-oriented. For a crack, undercut it with your grinder, vacuum it out, then brush on a concrete bonding agent. Mix your patching compound to a thick, peanut butter-like consistency, press it deep into the crack with a putty knife, and overfill it slightly. Smooth it flush with a trowel. Let it cure fully according to the product directions before you think about painting. This repair is now part of your floor, not just a Band-Aid on top of it.
Choosing Your Floor Armor: Paint, Epoxy, or Something Stronger?
What type of paint is best for a garage floor? The real answer depends on how you use your space and your budget. A basic acrylic works for a storage-only garage, but if you park cars, work on projects, or have kids playing basketball, you need something tougher. Think of it like choosing a floor finish for your kitchen-you wouldn’t use the same sealant on a high-traffic hallway as you would on a pantry wall. Sometimes, it’s not just about paint but also about the right stain for your concrete floors.
Standard Garage Floor Paints (Acrylic/Latex)
You’ll find these water-based paints at any home center. Brands like Behr or Rust-Oleum make garage-specific versions. They roll on just like painting a wall.
The big advantage is simplicity: you can open a can and start painting with just a roller and a brush. Cleanup is easy with soap and water. For a garage that sees light duty-maybe it’s just for storage and the occasional parked car-this can be a perfectly fine, budget-friendly solution for a few years.
But I’ve found their limits are real. They don’t bond to the concrete as tenaciously as chemical coatings. Hot tire pickup, where your tires literally stick to and peel the coating on a warm day, is a common problem. They also lack serious chemical resistance. A spilled gas can or oil drip will often stain or soften the paint. I used a basic one-coat product in a client’s storage shed and it looked good, but I wouldn’t recommend it for a working garage.
Two-Part Epoxy Kits: The DIY Gold Standard
This is where you get serious durability without hiring a pro. A two-part epoxy kit, where you mix a resin and a hardener, creates a chemical bond with the concrete that paint just can’t match. Look for kits labeled “100% solids” for the best wear layer.
For most homeowners tackling their own floor, a high-quality two-part epoxy kit offers the best balance of toughness and manageable application. Brands like Rust-Oleum RockSolid or Epoxy-Coat are staples you can find and they work well when you follow the instructions to the letter, despite what you may hear about epoxy being too complicated.
The trick is in the mix. Once you combine the two parts, you start a chemical reaction. This gives you a “pot life”-usually 30 to 45 minutes-to get the material out of the bucket and onto the floor. Work in small, manageable sections. I use a heavy-duty drill with a mixing paddle to ensure it’s absolutely uniform. Any unmixed hardener will create soft, sticky spots that never cure right. Wear chemical-resistant gloves and ensure strong ventilation; the fumes are potent.
Polyurea and Polyaspartic Topcoats
These are the professional-grade champions. I use polyaspartic topcoats over epoxy for clients who want maximum UV resistance (no yellowing) and a floor that can be driven on in 24 hours. They cure incredibly fast and are extremely durable against chemicals and abrasion.
Polyurea and polyaspartic coatings are fantastic products, but their very short working time-sometimes just 5 to 10 minutes-makes them a challenge for a first-time DIYer. You must be prepared, move quickly, and have a helper. They are also more expensive per kit.
If you’re an experienced DIYer and want to try one, I suggest starting with a small area like a workshop corner. You’ll need to work with a notched squeegee and a special roller to spread it before it starts to set. For most homeowners, using a polyurea or polyaspartic as a clear topcoat over a fully cured epoxy base is a more achievable way to get that professional performance.
The Durability Verdict: Coating Comparison
Choosing a coating isn’t about picking the shiniest box at the store. It’s about matching the product’s real-world performance to your garage’s daily life. I’ve seen homeowners frustrated when a pretty floor chips in a year, and I’ve helped others install surfaces that last a decade. Let’s break down the three main contenders.
Epoxy: The Classic Workhorse
Epoxy is a two-part system you mix yourself. I’ve used kits from Rust-Oleum and Legacy Industrial. The chemical bond it creates is incredibly strong. For chemical resistance, a properly applied epoxy is your best defense against motor oil, brake fluid, and gasoline spills. It forms a hard, plastic-like shell. For abrasion, it handles dropped tools and rolling jacks well, but heavy steel objects can chip it if they hit just right. Most epoxies yellow badly in direct sunlight, so it’s a poor choice for a sun-drenched floor. The application is where many DIYers struggle. You must etch the concrete perfectly, the floor must be bone-dry, and you have a limited ‘pot life’ to get the mixed material down before it hardens in the bucket. There are a few popular epoxy floor myths versus reality, but ultimately, prep and conditions matter most to long-term performance.
Polyurea/Polyaspartic: The Fast, Tough Upgrade
Think of polyurea coatings as epoxy’s more advanced cousin. I started using these for client jobs about five years ago for their speed. Polyurea cures rock-hard in hours, not days, and its UV resistance is excellent, with very little fading over time. Its chemical and abrasion resistance matches or beats most epoxies. The trade-off is cost and skill. It’s more expensive, and because it sets so fast, you absolutely need two people applying it-one mixing, one rolling-to avoid a disastrous, lumpy finish. Brands like ArmorPoxy and Polyurea Supply Co. make great products, but they demand respect during installation. They are a superior option compared to traditional epoxy coatings.
Standard Acrylic Latex Paint: The Basic Protector
This is the gallon of concrete paint you find at any hardware store. Be clear about its role. Standard garage floor paint is a barrier, not an armor plating; it will wear down from tire traffic and stain easily from oil. Its chemical resistance is low. Abrasion resistance is poor; a dropped socket wrench will likely scrape it up. It also chalks and fades in UV light. The only real advantage is application ease. You can roll it on almost like wall paint, often over a slightly damp floor, with minimal prep. I only recommend this for a garage that solely parks cars and stores light, clean items.
Side-by-Side: What to Use and When
| Coating Type | Best For | Think of It As |
| Epoxy | Heavy-Duty Workshops | A truck bed liner for your floor. Tough, chemical-proof, but can degrade in full sun. |
| Polyurea | Balanced Use (Premium Pick) | A high-performance clear coat. Superior all-around protection if your budget allows. |
| Standard Paint | Parking Only / Low Budget | A primer. It looks clean initially and protects from dust, but don’t expect it to handle abuse. |
My advice is straightforward. For a busy workshop where you weld, change oil, or build projects, invest in a 100% solids epoxy or a polyurea. If your garage is a multi-purpose space for parking, gym equipment, and some DIY, a polyurea gives you the best blend of durability and fade resistance. If you just want a clean, gray look for a parking bay that never sees chemicals or tools, a quality acrylic latex paint applied over a good cleaner and etcher is a totally valid, budget-friendly choice.
The Gearhead’s Application Checklist: How to Paint a Concrete Garage Floor Right

Let’s cut to the chase. You’ve got your concrete prepped and your product picked out. The big question now is, how do you apply epoxy or floor paint correctly so it lasts for years? The secret isn’t just in the paint can-it’s in the tools you use and the method you follow.
Gather everything on this list before you mix a single drop. Once that epoxy starts curing, you don’t have time to run to the store. I learned that the hard way on my first big job. For a 2-car garage, here’s your master list:
- Diamond grinder (rental is fine) for any heavy etching or grinding
- Acid-resistant chemical sprayer (like the Chapin 1949) for etching solution
- 18-inch long-handled roller frame
- Epoxy-specific roller covers (1/2″ or 3/4″ nap, not foam!)
- Spike shoes (these are non-negotiable for walking on wet epoxy)
- Power drill with a dedicated mixing paddle
- High-quality 2-3 inch angled sash brush for cutting in edges
- 5-gallon buckets (at least three)
- Paint tray and liners
- Shop vacuum with a fine dust filter
- Push broom
- Painter’s tape and plastic sheeting
Essential Tools for a Pro Finish
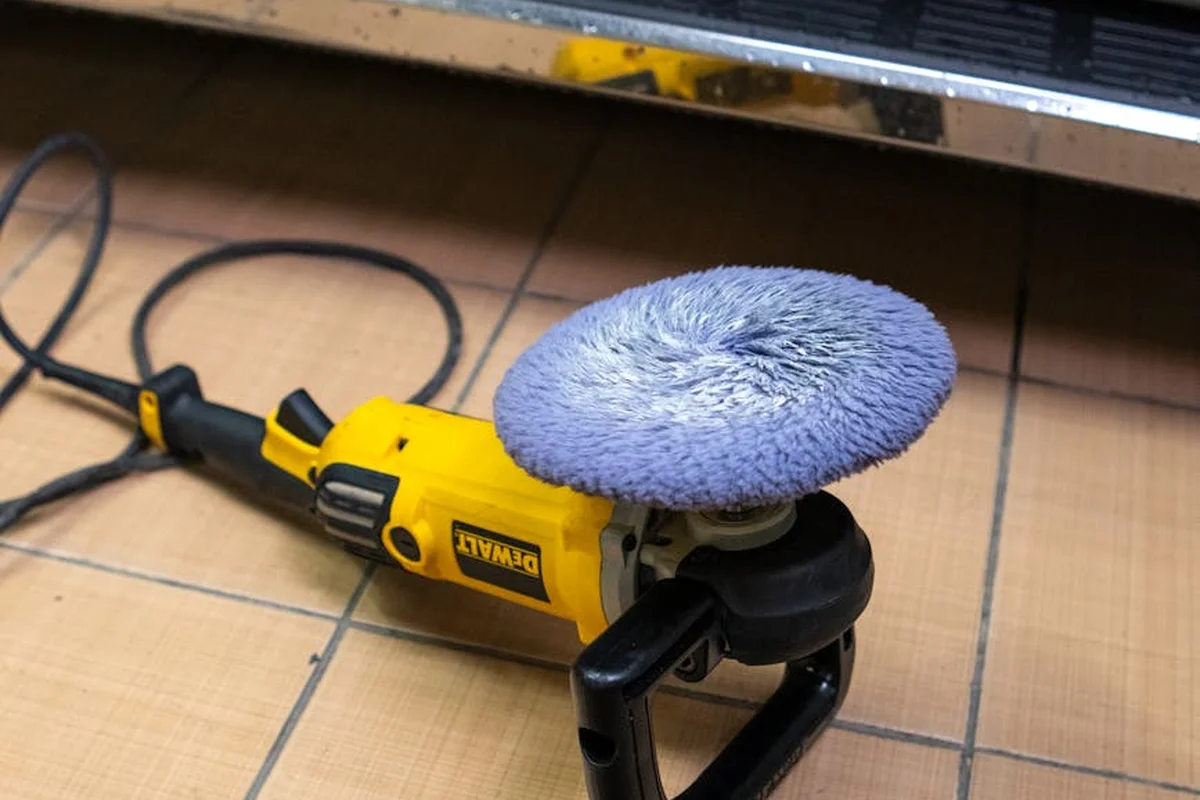
You can have the most expensive epoxy kit money can buy, but use the wrong roller and you’ll be looking at a floor covered in fuzz. Cheap roller covers shed fibers that get locked into your coating, creating a rough, unprofessional texture you can’t fix. I only use roller covers labeled for epoxy or urethane, like the Wooster Pro/Doo-Z or similar. The heavier nap holds more material and applies a thicker, more consistent film.
For edges and tight spots, don’t skimp on the brush. A Purdy or Wooster brush with flagged bristles will give you a clean line without leaving brush strokes. Your mixing paddle is also critical. I use a Jiffy brand epoxy mixer because its twisted design pulls material from the bottom of the bucket. A standard paint stirrer just won’t blend the two-part epoxy thoroughly, leading to soft spots that never fully cure.
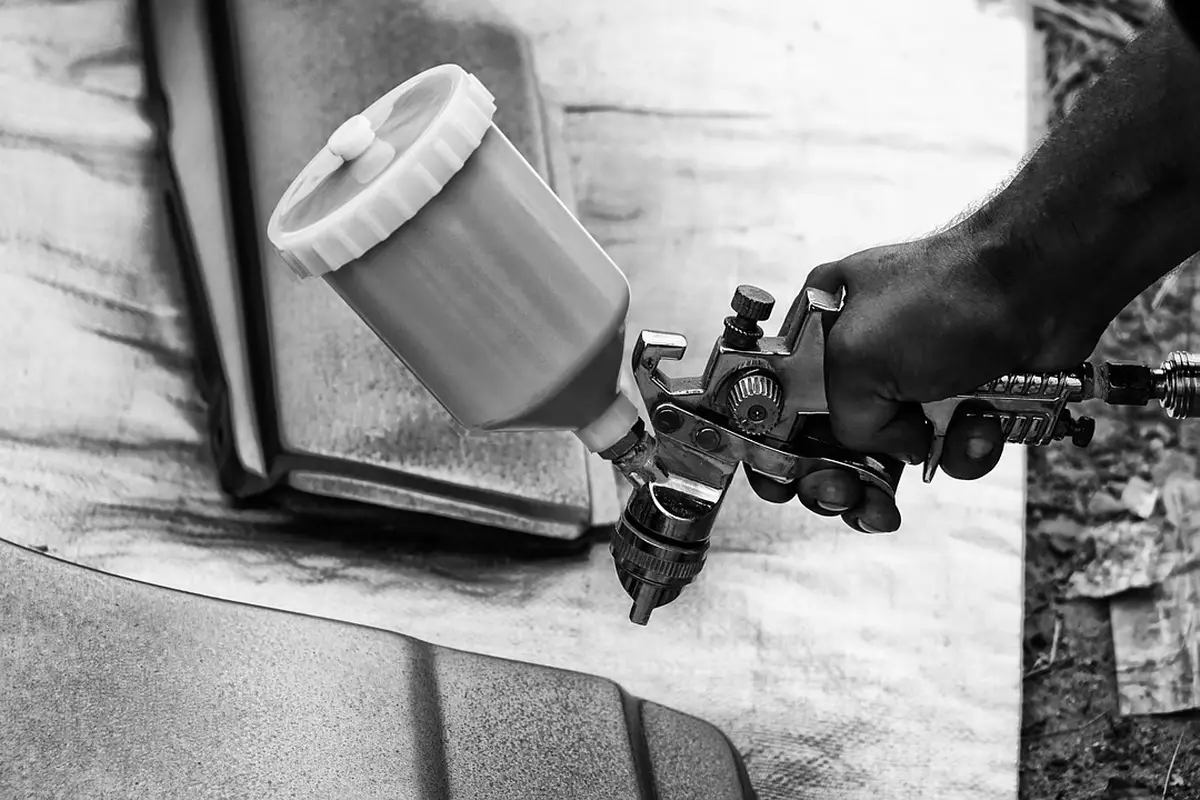
For application, I’ve tried a few methods. Pouring and rolling is standard. For larger spaces or if you’re adding anti-slip grit (more on that later), a sprayer can be a game-changer for speed and even coverage. I’ve had good results with the Wagner Control Pro 190 for solvent-based paints, but you must clean it meticulously immediately after use. If you’re not comfortable with a sprayer, a roller is completely effective.
Step-by-Step: Applying Your Do-It-Yourself Garage Floor Coating
Check the weather and your product label. Most epoxy and paint needs the concrete temperature to be between 55°F and 90°F, and rising. Humidity should be below 85%. I keep a simple digital hygrometer in my shop to check. Painting when it’s too cold or damp is the number one reason coatings fail to cure properly.
Once your floor is clean, dry, and etched, you’re ready to start. Work in manageable sections, about 10×10 feet. Put on your spike shoes-you’ll feel silly, but they prevent catastrophic footprints.
- Cut in the edges first. Use your quality brush to paint a 3-4 inch band along all walls, corners, and around any posts or drains. This is called “cutting in.”
- Pour the mixed coating onto the floor in a zig-zag pattern within your section. Don’t pour it all in one puddle.
- Roll it out immediately. Use your long-handled roller to spread the material evenly. Use a “W” pattern to ensure full, even coverage without leaving roller marks. Keep a wet edge by slightly overlapping each new roller pass into the previous one.
- Move to the next section and repeat, always maintaining that wet edge where the new section meets the last. If you let it dry, you’ll see a visible seam.
The most critical step with a two-part epoxy is respecting the recoat window. This is the time frame printed on the can, usually between 12 and 24 hours after application, when the epoxy is chemically ready for a second coat or clear topcoat. If you miss it, you must wait for it to fully cure (about 7 days) and then sand it before recoating. Set a timer.
Adding Flakes and Anti-Slip Grit
Color flakes aren’t just for looks. They help hide minor imperfections in the concrete and add texture. Broadcast the flakes into the wet epoxy immediately after you roll a section, before it starts to set. I scoop a handful and sprinkle them from about chest height, like you’re salting fries. This gives a natural, scattered look. Don’t throw them from too low or you’ll get clumps. For full coverage, you’ll use about 1/4 to 1/2 pound per square foot.
For safety, especially near workbenches or where oils might drip, I always add anti-slip grit. You can use silica sand or specifically manufactured additives like SharkGrip. For the best traction, mix the anti-slip grit directly into your clear topcoat, not the base color coat. Stir it in thoroughly according to the package directions-usually 1-2 pounds per gallon. This suspends the grit throughout the coating. If you just sprinkle it on top, foot traffic will wear it off in high-traffic areas over time. A floor that looks great but isn’t safe isn’t a job well done.
Curing, Moving Back In, and Long-Term Care
You asked how long garage floor paint lasts. I get that question a lot. The honest answer is that a quality floor coating should last 5 to 10 years, but its real lifespan is completely in your hands-it depends entirely on your prep work, the product you choose, and how you care for it. A cheap single-part epoxy slapped over a dirty floor might peel in a year, while a professionally applied polyaspartic coating on a perfectly etched slab can look new for a decade or more.
Timing is everything when you’re ready to use the space again. Here are the realistic wait times I plan for, based on the products I use most:
- Epoxy Kits (like Rust-Oleum EpoxyShield): Dry to walk on in about 12 hours. You can carefully move light items back in after 24 hours. Wait a full 72 hours before parking a car on it.
- Polyurethane Topcoats (often used over epoxy): These cure faster. You can usually walk on them in 4-6 hours and drive on them in 24.
- 100% Solids Polyaspartic: This is the fastest. It’s often walkable in an hour and ready for vehicle traffic in 12-24 hours, which is a huge advantage if you need the garage back quickly.
The Critical Cure Time
This is the most common mistake I see. People think “dry to the touch” means “done.” It does not. Think of it like baking a cake. The outside might look set, but the inside is still soft. Dry means the solvents have evaporated from the surface; cured means the chemical reaction is complete and the coating has reached its full hardness and durability.
Putting a 4,000-pound car on a floor that’s only dry is like sitting on that half-baked cake. You’ll get permanent tire marks, imprints from jack stands, or worse, the coating can peel up from the concrete. I always tell clients to add an extra safety buffer to the manufacturer’s cure time, especially in cool or humid weather which slows everything down.
Keeping Your New Floor Looking Good
A clean floor is a long-lasting floor. I use a simple routine: sweep weekly to get grit off, and mop every month or two with a pH-neutral cleaner. I buy Zep Neutral Floor Cleaner by the gallon-it’s cheap and doesn’t degrade the coating like acidic or harsh cleaners will. For oil spills, cat litter is your first line of defense to soak it up before it stains.
Even with care, chips happen from dropped tools. For small repairs, keep a tiny bit of your coating product. Clean the chip with mineral spirits, scuff the area lightly with 80-grit sandpaper, and apply a small dab of paint with a fine brush. For larger areas of wear or if the coating starts lifting in sheets, spot repairs won’t hold-that’s your sign the bond has failed and a full recoat is the only real fix. The good news is, if you prepped well the first time, prepping for a recoat is much easier.
Recommended Products and Final Pro Tips
You don’t need to overcomplicate the product choice. In my shop, we lean on a few reliable types of coatings, and I suggest you do the same.
- A two-part, 100% solids epoxy kit is your best all-around bet for a balance of durability and DIY-friendliness. The chemical reaction as you mix the parts creates a very hard, bonded surface.
- For the ultimate in chemical and scratch resistance, especially if you work on cars, look at a polyurea or polyaspartic topcoat. These cure faster and can handle more temperature swings.
- A high-quality acrylic latex or concrete paint is a budget-friendly option for lower-traffic areas, but know it won’t hold up to chemicals or heavy abuse like the others.
Choosing the right product is half the battle. Applying it correctly is what makes it last. Here are the lessons I’ve learned the hard way.
Buy Smarter, Not Cheaper
Always buy about 10% more material than the kit says you need for your square footage. Running out of mixed epoxy halfway across your floor is a nightmare you cannot fix easily. Having extra lets you touch up thin spots and gives you a margin for error. I keep a spare mixing bucket and rollers on hand too; once epoxy starts to harden in your tools, they’re useless.
Respect the Primer
If your coating kit includes a primer or etching step, do not skip it. I’ve seen floors fail because someone thought the paint alone would stick. The primer is the critical handshake between your concrete and the new coating. Skipping primer to save an hour is a guarantee your beautiful new floor will peel up in sheets within a year. Follow the kit’s prep instructions to the letter.
Your Lungs Are Not Optional Equipment
These are chemical products. Open all doors and windows, and use a powerful box fan to pull air through the space. Wear a proper respirator with organic vapor cartridges, not a dust mask. Good ventilation isn’t just for smell; it’s for your safety and helps the coating cure properly. I also wear nitrile gloves and safety glasses-this stuff doesn’t come off skin easily.
The Devil is in the Prep
Your floor must be surgically clean and etched for the coating to grip. After sweeping, I use a concrete degreaser and a stiff brush on any oil spots. For the final etch, I rent a walk-behind diamond grinder. It’s more work than an acid etcher, but it gives a perfectly consistent, profile-ready surface with no chemical residue to rinse. There is no shortcut for prep. The coating will only be as good as the surface it’s stuck to.
This might sound like a lot of steps, but that’s what makes it a professional-grade job you can do yourself. Take your time on the preparation, follow the product instructions, and you will have a garage floor that looks fantastic and stands up to real life for years.
Garage Floor Paint FAQ: Quick Answers from a Pro
1. What’s the single most important prep step most DIYers miss?
The final moisture check after etching and drying. Before you open a paint can, tape plastic sheeting to the floor for 24 hours. Any moisture underneath means you need a moisture-blocking primer, or your new coating will blister and fail.
2. Is an epoxy kit really worth the extra cost and effort over standard paint?
Absolutely, if you use the garage for anything more than passive storage. Epoxy forms a chemical bond, creating armor against oil, hot tires, and abrasion. Standard paint is just a surface film that will wear through quickly under real use. That’s why many homeowners weigh epoxy vs paint for a garage floor. Epoxy often wins on durability and maintenance.
3. How do I avoid a sticky, uncured mess when applying epoxy?
Mix thoroughly and respect the pot life. Use a drill with a proper mixing paddle for a full two minutes. Once mixed, you typically have 30-45 minutes to apply it all. Work in small sections with a helper to beat the clock.
4. Can I speed up the curing process so I can park sooner?
You can influence it, but don’t rush it. Ensure the floor and air temperature are within the product’s specified range (usually 55-90°F). Using a space heater to gently warm the space can help, but forcing heat directly onto the coating will cause defects.
5. What’s the best maintenance routine to maximize the coating’s lifespan?
Sweep weekly and mop monthly with a pH-neutral cleaner. Immediately absorb oil or chemical spills with an absorbent like cat litter-don’t let them sit. This prevents stains and degradation of the coating’s chemical resistance.
Final Thoughts on Your Garage Floor Project
If you remember just one thing from this guide, let it be this: the quality of your surface preparation directly determines how many years of service your new floor will give you. Here are the core lessons from my shop that I apply on every job:
- Always select a paint formulated for garage floors, like a two-part epoxy; I lean toward Rust-Oleum EpoxyShield for its balance of durability and DIY-friendly application.
- Clean and etch the concrete thoroughly with a muriatic acid solution-this isn’t a step to rush, as it’s the only way to get the paint to grip properly.
- Apply your coats with a high-density foam roller made for epoxy; the cheap nap rollers from the big box stores often shed fibers and leave a rough finish.
- Add anti-slip silica sand to your final topcoat, especially near the door or workbench, to prevent slips from oil or morning dew.